Creating Metaball Animation with React Native Skia
- Published on
- | Minutes Read: 11 min
- Authors


Introduction
What's up mobile devs? I'm back with another animation, this time I'm using React Native Skia to build a Metaball animation. I'm also using React Native Skia Gesture to make it interactive.
I really want to thank you for supporting me, I'm really happy to see that you're enjoying my animations and that you're learning something from them.
As always I deeply recommend you to open the source code in the editor and play with it.
YouTube Tutorial
If you prefer to watch a video tutorial, you can find it on my YouTube channel:
Dependencies
This animation is fully built with React Native Skia and React Native Skia Gesture.
npx expo install @shopify/react-native-skia react-native-skia-gesture
Approach and Implementation
Let's be honest, if you don't know what's the trick behind this animation you feel like you're in a black box. I've always been fascinated by this kind of animation, and I've always wanted to build one. The fun part is that it's very simple to build.
The interactive circles
In order to build the circles, I've used the Path component from React Native Skia. The interesting part is that in order to interact with the circles, I've used two transparent Touchable.Circles (react-native-skia-gesture).
  ...
  return (
    <View style={styles.container}>
      <StatusBar style="light" />
      <Touchable.Canvas style={{ flex: 1 }}>
        <Group layer={paint}>
          <Path path={path}> {/** The circles */}
            <SweepGradient
              c={vec(0, 0)}
              colors={['cyan', 'blue', 'cyan']}
            />
          </Path>
        </Group>
        <Touchable.Circle {/** The fake transparent circle */}
          cx={secondCx}
          cy={secondCy}
          r={(RADIUS / 60) * 30}
          {...secondCircleGesture}
          color={'transparent'}
        />
        <Touchable.Circle {/** The fake transparent circle */}
          cx={firstCx}
          cy={firstCy}
          r={(RADIUS / 60) * 30}
          {...circleGesture}
          color={'transparent'}
        />
      </Touchable.Canvas>
    </View>
  );
The path is composed of two circles, and the gradient is applied to the path. The two transparent circles are used to interact with the circles.
Basically, the advantage of using the Touchable.Circle is that it's very easy to use, and it's very performant. The disadvantage is that it's not possible to use the Touchable.Circle with the Path component. That's why I've used two transparent Touchable.Circle, one for each circle.
...

const { width, height } = useWindowDimensions();

const firstCx = useValue(width / 2);
const firstCy = useValue(height / 2);

const circleGesture = useGestureHandler<{
  x: number;
  y: number;
}>({
  onStart: (_, context) => {
    context.x = firstCx.current;
    context.y = firstCy.current;
  },
  onActive: ({ translationX, translationY }, context) => {
    firstCx.current = context.x + translationX;
    firstCy.current = context.y + translationY;
  },
});

const secondCx = useValue(width / 2);
const secondCy = useValue(height / 2);

const secondCircleGesture = useGestureHandler<{
  x: number;
  y: number;
}>({
  onStart: (_, context) => {
    context.x = secondCx.current;
    context.y = secondCy.current;
  },
  onActive: ({ translationX, translationY }, context) => {
    secondCx.current = context.x + translationX;
    secondCy.current = context.y + translationY;
  },
});

...
The effective path is then computed using the useComputedValue hook.
...
const path = useComputedValue(() => {
  const circles = Skia.Path.Make();
  circles.addCircle(firstCx.current, firstCy.current, RADIUS);
  circles.addCircle(secondCx.current, secondCy.current, RADIUS);
  circles.simplify();
  return circles;
}, [firstCx, firstCy, secondCx, secondCy]);
...
The fluid effect
The fluid effect relies on this simple code:
...
const paint = useMemo(() => {
  return (
    <Paint>
      <Blur blur={30} />
      <ColorMatrix
        matrix={[
          // R, G, B, A, Position
          1, 0, 0, 0, 0,
          0, 1, 0, 0, 0,
          0, 0, 1, 0, 0,
          0, 0, 0, 60, -30,
        ]}
      />
    </Paint>
  );
}, []);
...
I've already used a similar trick for the Fancy Bottom Bar animation.
Let's see all the steps in detail:
- Apply the blur:
...
const paint = useMemo(() => {
  return (
    <Paint>
      <Blur blur={30} />
    </Paint>
  );
}, []);
...

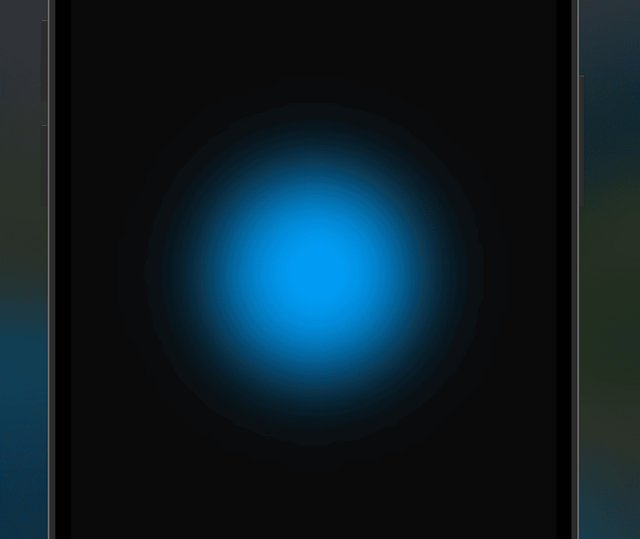
- Add a color matrix (Identity):
...
const paint = useMemo(() => {
  return (
    <Paint>
      <Blur blur={30} />
      <ColorMatrix
        matrix={[
          // R, G, B, A, Position
          1, 0, 0, 0, 0,
          0, 1, 0, 0, 0,
          0, 0, 1, 0, 0,
          0, 0, 0, 1, 0,
        ]}
      />
    </Paint>
  );
}, []);
...
And nothing will change.
- Increment the opacity of the blurred path by 60 (experimental value):
...
const paint = useMemo(() => {
  return (
    <Paint>
      <Blur blur={30} />
      <ColorMatrix
        matrix={[
          // R, G, B, A, Position
          1, 0, 0, 0, 0,
          0, 1, 0, 0, 0,
          0, 0, 1, 0, 0,
          0, 0, 0, 60, 0,
        ]}
      />
    </Paint>
  );
}, []);
...
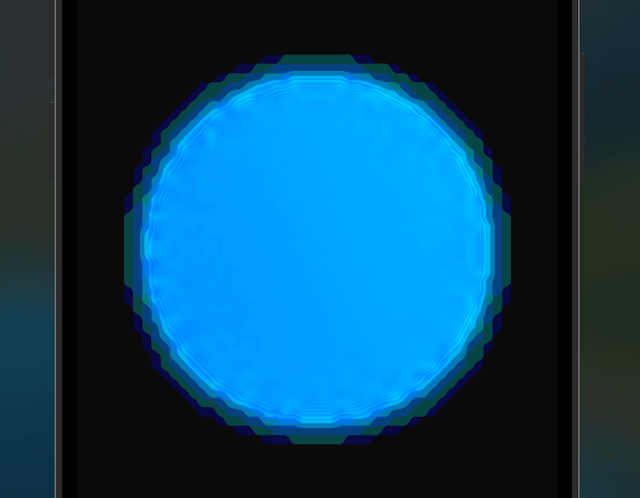
- Decrement the opacity of the blurred path by 30 (experimental value):
...
const paint = useMemo(() => {
  return (
    <Paint>
      <Blur blur={30} />
      <ColorMatrix
        matrix={[
          // R, G, B, A, Position
          1, 0, 0, 0, 0,
          0, 1, 0, 0, 0,
          0, 0, 1, 0, 0,
          0, 0, 0, 60, -30,
        ]}
      />
    </Paint>
  );
}, []);
...
That means that we are going to keep the values inside the blurred path that are greater than 30. Of course the opacity is going to be higher for the values that are close to the center of the circle.
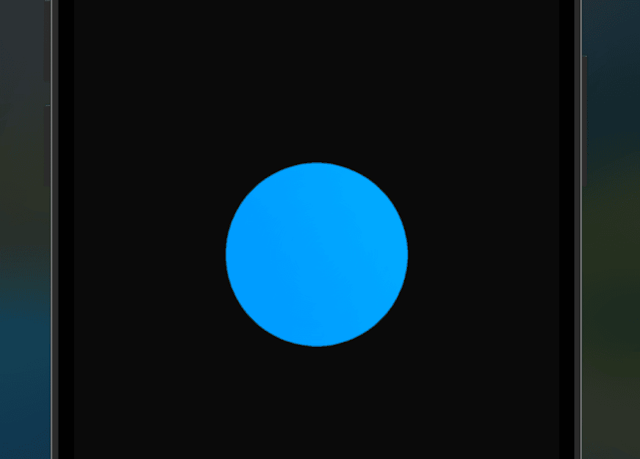
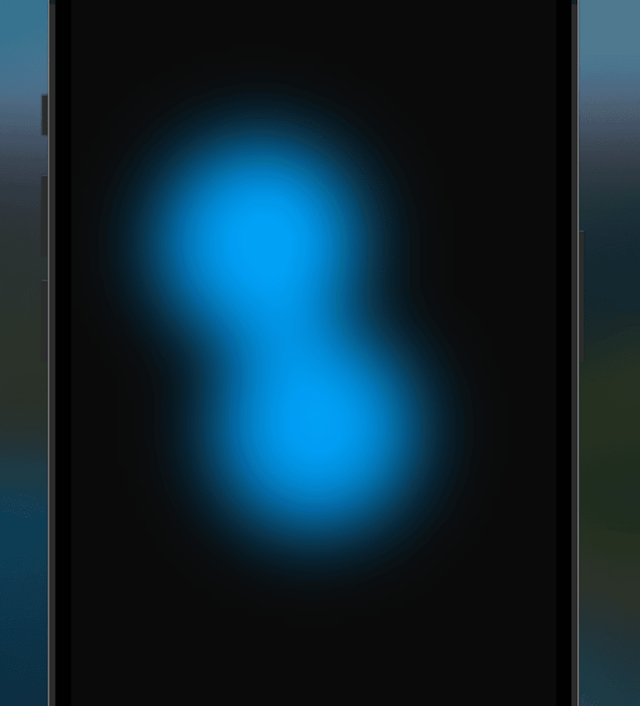
Why this is working? 🤔
We are applying these effects to a path that contains two circles. The blurred path is going to be the union of the two circles. I believe that this image will definitely help you to understand the trick! 😄

Conclusion
I hope you enjoyed this tutorial and that you learned something new. I'm really excited to see what you will create with this technique and I'm looking forward to seeing your creations on Twitter!
Join me on Patreon and be a part of the community 🎊
- More than 50+ exclusive animations made with Reanimated, Gesture Handler and React Native Skia
- Get access to my newsletter and be the first to know about new content
- Join a community of like-minded individuals passionate about React Native